O11S - Omega
Written by:
Ceo-of Bunnings@Adamantoise
Summary
Raidplans:
-
Start + Peripheral Synthesis 1: View Plan
-
Level Checker Phase (Program Loop) + Other: View Plan
-
Peripheral Synthesis 2 + Pantokrator 1 + Peripheral Synthesis 3: View Plan
-
Pantokrator 2: View Plan
Arena Waymarks:
{
  "Name": "O11S - XIVMine",
  "MapID": 593,
  "A": { "X": 89.0, "Y": 0.0, "Z": 81.0, "ID": 0, "Active": true },
  "B": { "X": 119.0, "Y": 0.0, "Z": 89.0, "ID": 1, "Active": true },
  "C": { "X": 111.0, "Y": 0.0, "Z": 119.0, "ID": 2, "Active": true },
  "D": { "X": 81.0, "Y": 0.0, "Z": 111.0, "ID": 3, "Active": true },
  "One": { "X": 81.0, "Y": 0.0, "Z": 89.0, "ID": 4, "Active": true },
  "Two": { "X": 111.0, "Y": 0.0, "Z": 81.0, "ID": 5, "Active": true },
  "Three": { "X": 119.0, "Y": 0.0, "Z": 111.0, "ID": 6, "Active": true },
  "Four": { "X": 89.0, "Y": 0.0, "Z": 119.0, "ID": 7, "Active": true }
}
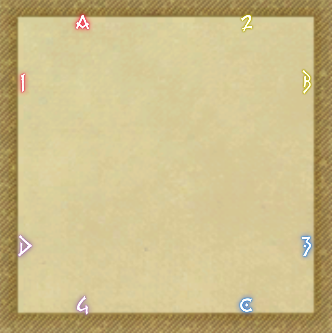

Waymarks are used for lining up the fists during Peripheral Synthesis 2.
Suggested Resources:
Some of the strategies in this video may differ from what is presented in the guide and raidplan. It is recommended to clarify what strategies you are using with your team to avoid any confusion.
Detailed Guide:
Repeat Mechanics:
Atomic Ray: High Damage Raidwide. Heal and shield as necessary.
Mustard Bomb: Magical Tankbuster that inflicts bleeding. Healers should manage the tank affected by the bleed where necessary.
Starboard/Larboard Wave Cannon:
- Starboard: 200-degree cleave to the right side of the boss, with a 180-degree turn after.
- Larboard: 200-degree cleave to the left side of the boss, with a 180-degree turn after. Flamethrower: Protean on player location, followed by another Protean on the snapshotted location. Ensure everyone is spread to avoid clipping.
Start:
The fight starts off with the boss casting Atomic Ray, then Mustard Bomb, then Flamethrower and then into a Starboard/Larboard Wave Cannon. Deal with these as needed.
Peripheral Synthesis 1:
The boss will summon 6 rocket punch ads on all DPS and Healers, 3 of them being blue and 3 being yellow. These fists will mark the area under their designated player with a circle AoE before the AoE goes off.
To resolve this mechanic, two fists of opposite colours must explode into each other, destroying the fists and leaving behind a Live Wire Puddle, which can be picked up to give a damage buff. If two fists of the same colour explode, they deal massive raidwide damage.
Split the group into pairs on each cardinal; Tanks North, H1/D3 West, H2/D4 East, D1/D2 South. This will either:
- Spawn 3 sets of fists with opposite colours on top of eachother, allowing the mechanic to resolve itself.
- Spawn 1 set with the correct set, and the other 2 sets with the same coloured fists. Have one person each from the two incorrect sets swap spots with each other as soon as possible. We had D1/D3/D4 as our ‘flexing’ players for this.
Once the mechanic is resolved, the DPS can then pick up the puddle for a damage boost.
If you don’t manage to bait the fists immediately in the first round, relax and stand on top of your partner again! You have multiple attempts to bait before they explode and deal raidwide damage.
Program Loop:
Following another Mustard Bomb, Omega will become untargetable and death zones will spawn on the edge and the centre of the arena, instantly killing the player if they step inside. A Level Checker will spawn, which needs to be killed before the Force Quit Enrage cast ends.
Ferrofluid + Executable 1 + Towers
Level Checker will use Executable 1, giving a 14 second Looper Debuff, and Ferrofluid, applying a positive or negative charge and a tether, connected to another player. 4 meteor towers will also spawn in two possible patterns around the arena.
To resolve, players will spread around the boss, Supports North DPS South, RMMR, and then must check their own and their tethered partner’s charge. If a pair has the same charge, they will be pushed away from each other. If a pair has opposite charges, they will be pulled towards each other.
Players with the same charge will need to stand towards the centre to get pushed into the outer meteor towers. Players with opposite charges will need to stand around the edge of the arena to get pulled into the inner meteor towers. If done correctly, all towers will be soaked by two players each, removing the looper debuffs from each player. If a tower is not soaked, huge raidwide damage will go out and a damage down debuff will be given to all players.
Executable 2 + Chain of Memory
Level Checker will place a Chain of Memory debuff on the two furthest players from Level Checker that forms a large line AoE between them. Touching this AoE will confuse the player that hits the chain. This chain moves between the area of the two players and is also controlled by them. Level Checker will also give Looper debuffs on the 6 remaining players, with 3 different rebuff durations and spawn in meteor towers.
To resolve this, D3 and D4 should go to the East and West edge of the arena to receive the Chain of Memory debuff and must stay around the edge of the arena in order to avoid Memory Degradation stacks. If these stacks hit 6, the players will be confused and may die.
The rest of the party will stack on the North or South side of the Level Checker depending on the pattern of the previous Executable towers. If the far towers were North and South, the party will stack South. If the close towers were North and South, the party will stack North.
The chain and the first close tower will spawn. The two players with the shortest Looper debuff will soak this tower. Once this tower is soaked, the Chain of Memory players will move clockwise until they are standing in the outer towers. The centre players should also move to avoid the chain. The centre tower should then be soaked by the players with the next shortest Looper debuffs.
Once the 2nd centre tower is soaked, the Chain of Memory players move clockwise to the next outer towers to soak those, and the final players with Looper debuffs should soak the 3rd set of towers.
If you are in the centre area soaking towers and your debuff is less than 10 seconds, you are soaking the next tower.
As the Chain of Memory players soak their final towers, a large point blank AoE will appear under the Level Checker. Simply move out, then back in to avoid the following donut AoE.
The boss will cast Delta Attack, a huge raidwide. Heals + Tank LB3 are needed to survive the attack.
Ballistic missiles + Flamethrower:
All players are marked with circle AoEs and Omega will also cast Flamethrower.
Resolve this mechanic as per usual, except ensure that all players are standing at least at max melee distance away from the boss, or further. After the players dodge the flamethrower, the AoEs leave a lingering puddle which need to be outside of the bosses hit box to give enough room to resolve the next mechanic.
Two Starboard/Larboard Wave Cannon attacks will go off which need to be dodged inside the bosses hit box to not touch the puddles dropped in the previous mechanic.
Mustard Bomb will also go off after this sequence.
Blaster:
A tether will target a player, which needs to be taken by the OT and must then move away from the raid to soak in order to not hit the other players. If the OT is not at full HP when taking this attack, they will get a doom debuff, so healers must ensure that the OT is topped off. The OT will receive a hp and damage penalty.
Atomic Ray will follow, where healers must pay extra attention to the OT due to the HP debuff.
Peripheral Synthesis 2:
Four large fists will spawn around the edges of the arena, with each fist tethered to a tank, healer and 2 dps respectively. We will use the waymarks to line up the Rocket Punches such that they travel across the edges of the arena, providing a safe zone in the middle for the other players.
The first players that are tethered will move to the waymark closest to the fist and sit on the waymark while the rest of the players will sit in the middle of the arena. Once the first round of fists go off, a stack marker will appear which should be soaked in the middle by everyone.
A second wave of fists will appear where those that did not get tethered in the first wave will now be tethered. Resolve the mechanic the same way. Tanks will need to do a tank swap here in order to keep the boss in the middle.
If you are tethered by the 2nd wave of fists, it is recommended to sprint after the 2nd wave of fists go off to run back into the middle to resolve the following Starboard/Larboard Wave Cannon easier.
Omega then casts Update Program, which will enhance most of Omega’s basic mechanics from this point onwards.
Flamethrower will go off but will now enflict a 10s burn debuff, so healers should heal this appropriately.
Starboard/Larboard Wave Cannon Surge will go off. It is the same as Starboard/Larboard, but followed up immediately by another of the same attack, so the party must run through as soon as the animation for the first attack goes off.
Pantokrator:
The boss will cast 4 sets of circle AoEs under players alongside small raidwides. Players should stack on the south side of the bosses’ and move CCW once the first set of puddles are dropped, ensuring to only move to the edge of the puddle to control where the dropping locations are.
Once the 4th set of puddles spawn, the group can soak the stack marker safely.
After, 4 closest players will be marked with Wave Cannon Kyrios, a line AoE from the boss to the marked player, giving a magical vulnerability debuff.
To resolve this, after the stack marker goes off, players should go to their clock spots. Supports should stand inside the hitbox first until the markers appear over their heads and the DPS on the outside to ensure that the Supports will bait the Wave Cannon Kyrios first.
Once the players are marked, marked players should move out to max melee to dodge the circle AoEs that will appear while maintaining their clock spots. As the first set of Wave Cannon Kyrios attacks go off, the DPS should start to move into the bosses hitbox to receive the markers for the 2nd set. Once the DPS receive their markers, DPS should move to max melee to avoid the puddles while maintaining the clock spots, safely resolving this mechanic.
Players should then move to the North East corner of the arena to avoid the Long Needle Kyrios Proximity AoE and stay in this corner to resolve the next set of mechanics.
Blaster should be taken by the OT again, which is then followed by Atomic Ray. Healers once again should pay extra attention to the OT.
Peripheral Synthesis 3:
8 red fists will spawn around the arena. When two of them hit each other, they will deal high raidwide damage. If more than two hit each other, the damage will be too high, wiping the party.
There are two ways to resolve this mechanic and they entirely depend on if your group needs the melee LB3 for damage or not.
If your group needs the LB3 for damage, the tank should move the boss back to the middle and split the group into same role pairs from north to south (THMR). The tanks will first stack on each other to make their fists explode. After the fists explode, the healers will stand on top of each other to destroy their fists. Do this for the melee and then the ranged. This strategy allows the group to use the LB3 for damage by giving enough time for the healers to top up the group between rocket pair explosions.
Alternatively, if your group does not need the LB3 for damage, the group will stay in the North East corner and stack together. Just before the AoEs appear, use Tank LB3 and deal with all 8 fists at the same time, cheesing this mechanic. The MT can then move the boss back to the middle after the fists are destroyed.
Another Mustard Bomb and Atomic Ray will follow.
The enhanced Flamethrower will go off and then Starboard/Larboard Wave Cannon Surge. Deal with this the same way as before.
Pantokrator 2:
Circle AoEs will appear just like the first Pantokrator but this time, cone AoEs will also rotate around the boss and a Guided Missile Kyrios will target the furthest player for 6 circle AoEs.
To resolve: OT will move to the North East corner to bait the Guided Missile Kyrios and use their invuln to tank all 6 attacks. The rest of the group will stack on the south side of the bosses' hotbox and move through the boss. When dropping puddles, the group will need to check the direction that the cone AoEs are going to ensure that once the 4th set has been dropped, they can move in the correct direction.
Condensed Wave Cannon is a stack marker soaked by everyone. The tanks will soon be targeted with more cone attacks, so all other players must be away from the tanks. It is recommended to be ready to move straight to your spot immediately after the stack marker goes off.
After the party stack, players should separate away from the tanks for the next set of Kyrios attacks, where the closest players will get marked for the line AoEs.
To resolve this, D1, D2 and H1 should move in first to bait the first attack. Other dps and healers should avoid these players to not get clipped. After the first set of line AoEs go off, D3, D4 and H2 should move in to bait the 2nd set of Line AoE, ensuring that once again, the other dps and healer do not get clipped by these AoEs.
The cannons can be baited along cardinals, allowing those who are not baiting yet to sit between them safely and consistently.
Long Needle Kyrios will appear in the middle. Resolve the same way as earlier by moving to the NE corner. Starboard/Larboard Surge will go off after too, which can be resolved while in the corner.
Charybdis will bring all players down to single digits of HP. Prioritise healing tanks first and then the rest of the party. This is because following this, Mustard Bomb will go off on the MT and a Blaster Tether will need to be intercepted by the OT. 3 Atomic Rays will go off, so ensure that the whole party is healed by then.
Loop is the hard enrage of the fight and the boss must be killed before the party is wiped.